
Table of Contents Previous topic Next topic
Using the Serial Port I/O Utility->Serial Port Input
Unless serial port input is coming from a Virtual Workshop extension, serial port input data can come from a file, from the keyboard of your PC or from a data window.
To write to the serial port input from your keyboard, type into the Serial Port View. To open the Serial Port View, select Output from the View menu or press Alt-2 and click on the Serial Port tab. (Note that the Serial Port View will not be created until you first run the simulator and so you will not see it until then. Also if you are using a variant that supports two serial ports, there will be a Serial Port View for each of them.)
The Serial Port View will not accept keyboard input if the serial port is not ready to receive it. In particular, the REN bit must be set and there must not already be a byte being shifted into the serial port.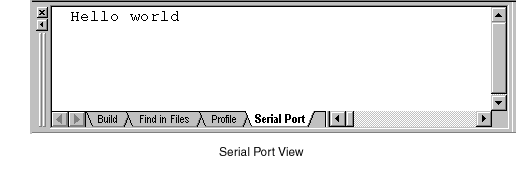
To enable serial port input from a file or a data window, select Serial I/O from the Peripherals menu. This opens the Serial I/O dialog box. The area enclosed by the Serial Input rectangle is concerned with serial input.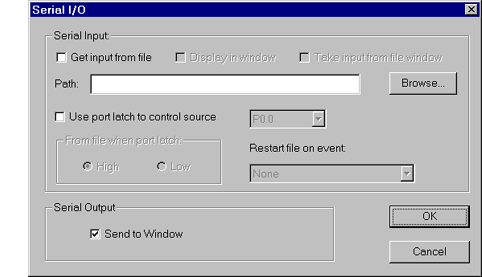
Click on the Get Input from File checkbox to enable or disable input from a file. A cross in this checkbox indicates that serial port input from a file is enabled. To choose a filename, click on the Browse button. This will open a file open dialog box allowing you to select a file. By default, the file is given a .DAT extension but you can specify a different extension if you wish.
If the file does not exist, you will be given the option for it to be created.
The data in this file can optionally be displayed in a window. Click on the Display in Window checkbox to enable or disable this option. A cross in this checkbox indicates that the file will be displayed in a window. 
The window will be opened automatically when you close the dialog box.
Note that by default it is the data from the file that is used for the serial port input data, not the data from the window. If you modify the data in the window, the file is not automatically updated. You need to save the window data to the file using the Save File command to update the file contents.
You can however specify that the data is taken from the data window rather than the file by checking the Take input from file window option. Then, if you modify the data in the window, the modified data will be automatically used as input when it is reached.
When it reaches the end of the file or window data, the simulator will automatically restart at the beginning of the data stream. In addition, it is possible to trigger a restart on an external interrupt. Select the appropriate event from the Restart file on event drop down list. The particular interrupt must of course be enabled by your program for this to take effect.
Unlike a real 8051 system which passively receives bytes, the simulator must decide when to load a byte from the file. It does this by checking the REN bit. If this is set, it will load the next byte from the file and start shifting it in. The simulator will keep checking the REN bit in case it goes low before the byte has been fully transferred. If it does go low the shift operation will be aborted. The byte that was being shifted in will not be lost, but will be saved and used as input next time the REN bit goes high.
In addition it is possible to control the input stream using the level of a port latch bit. The port latch bit is selected from the drop down list in the Serial I/O dialog box and the interrupt stream will depend upon whether this is high or low according to the high/low selection that you have made. In any case, there will be no input if the REN bit is low.
All of your serial port input and output settings are saved in the program status file when you close the 8051 program and will be re-instated when you next open the same program.
Note that the serial port input from a file feature may not be available if a variant extension DLL is being used.